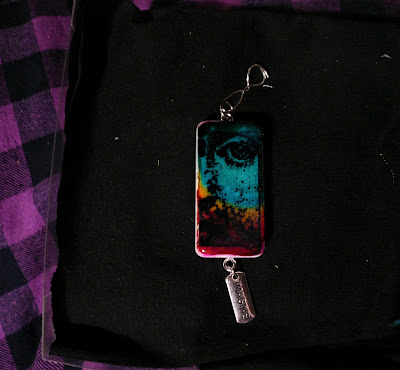
So, I've been seeing all of these awesome altered dominoes online, and since we've had a box of brand new ones laying around, unused, for years, I decided to give it a try. I had given it a half-try a couple of years ago by just stamping on the blank white back of one, but since then, I got interested in making fabric and paper beads, pendants, wire wrapping, etc., so I had hubby drill tiny holes in both ends of each plastic domino for eye screws, the whole box, because I dream big. Ha!
I've started with three, two of which I put a layer of clear gesso on, then a layer of acrylic paint, and that's as far as I've gotten, but I plan to hand paint a tiny landscape on each of them. Of course, that can change when I start playing with them again.
This one, I decided to use the three basic alcohol inks, that I've had forever, on. I experimented by dripping a bit of each color onto the domino, letting them sort of run together, and left it to dry. An alcohol pad carefully applied around the sides took off most of the ink that had run over, but the blue left a slight stain, which I'm not worrying about, because this is a learning experience.
Once it was dry, I stamped the half face onto it with a stamp I've had forever, and love, and black Stazon Ink. It's not quite as dark as it appears in this photo, and the bottom of the face kind of melded into the ink, but I like it.
When the stamp was dry, I applied a layer of Diamond Glaze dimensional glue, and left it to dry. That would have been the end of it, but I stuck my finger into the glue before it got good and dry, leaving a hole right in the middle, so I filled in the hole and added a second layer of glue, trying to even it out. When that was dry, there were some uneven edges, where the glue was a little thicker, so I added a third layer to get it more even, which also trapped some dust that had fallen onto the domino, making tiny little bumps in the finish. I don't mind though. Not trying to sell it or anything. Just learning.
It looks like it has a thick glass over it now! I added tiny silver eye screws, a charm that says "Imagine", and a jump ring through the top eye screw for a cord, ribbon, chain, etc., and it's ready to be a pendant, an ornament, or an embellishment. The wire hanger thingy at the top is only temporary to see how it looked hanging up, and if the blue stain on the side bothers me, I can always add a layer of paint or alcohol ink to cover it, and I would if it was a gift or for sale. For my purposes, however, it is fine as is!
A bit closer view!
The back, which is actually the front of the domino. Some people fill in the dots or paint over them. I chose to leave it alone, because I like it, and it has also occured to me that I could add a second charm, facing this way, with a different word, and it would make it reversible! Although, I should have paid more attention and let the two pink dots be on top. It was still fun to do, and I learned what not to do, so now on to the two still waiting!
You're never too old to learn something new, and it makes life interesting! Go for it!


No comments:
Post a Comment