Showing posts with label wire. Show all posts

Thursday, September 9, 2021

First Santos Cage Doll w Jen Rizzo-Part 3

I said this post would be of the finished doll, but since I'm having trouble finding what I want for her cage skirt, I decided to go ahead and post pictures of where she is now. 

I had a terrible time attaching her arms to her shoulders (I forgot to punch holes in each for a wire), and couldn't get my glue to hold them on even long enough to wrap the clay around them, so I had to try to hold them together with one hand and wrap them in clay with the other.  I finally got them attached and left them to dry 2-3 days. Hopefully, they will stay put!

 I had sanded her and painted a first coat of acrylic paint over white gesso on her face and body before attaching the arms.


After her shoulders dried, I sanded the new clay, gessoed it, then painted the new part paynes gray to match the bottom, then mixed a lighter shade and painted over the body. I also mixed a lighter shade of flesh and painted the hair and skin parts, then a darker version of flesh for lips and cheeks. 


So this is where she is until I can get her a skirt put together, except for a couple of touchups to her face and hair. I didn't attempt to make individual fingers on this doll, as I had a hard enough time shaping the hands onto the arms. I did make some lines to indicate fingers. Maybe on the next doll, I attempt fingers!


Close up of the face showing that she has thin eyebrows atop the shadows, which made it look like thick eyebrows in picture above.

I would have liked for her to be smoother, but, maybe because my air dry clay was kind of old, or maybe because I'm not well practiced in working with clay, it's as smooth as I could get it. Maybe that adds character to her though! A lot of firsts on this doll and she taught me a lot. All in all, she's my created child and I love her!

So, I will post another photo when she has her skirt on. She will be around 18" tall when done.

I haven't been working on any other projects lately, and this doll was created from the start on a tray in my lap while sitting in my recliner over 3-4 weeks. Not easy to juggle! 


PS-----I touched up her face and hair a couple of days after I posted, giving her a softer more pleasant attitude. I made the hair darker, gave her bluish eyes, and adjusted her lips a bit. I like her much better! The wooden pieces for her skirt should be here tomorrow! 

And they came and I got them attached, so she now has a skirt! Now to find a crown and accessories! Sorry about the picture quality!


I finally found some papier mache torso forms on Amazon, and ordered two, along with some papier mache eggs for heads, so I plan on trying at least one more Santos doll, maybe with articulated arms. But first, I need to catch up on some house chores! I think...

As long as I can create a little bit every day, I consider it a good day, no matter what else I'm letting go. Days I can't create, I peruse Pinterest and FB group creative photos for inspiration, which invariably makes me want to try something new. 

Stay safe, well, and do something just for you! It's good for your soul!


Monday, August 16, 2021

First Santos Cage Doll w Jen Rizzo-Part 2

I've started a cage doll, inspired by Jennifer Rizzo's course on Santos Cage Dolls on the www.jeanneoliver.com site. See the previous post, part 1. I love these dolls!

I watched all the videos and was anxious to get started, but I couldn't find any paper mache torsos, even online, the right size. I would love to have a wooden carved doll, but I don't have the patience for that. Jen shares several ways to construct the dolls, using household items, as well as paper mache forms. I decided to use a wire armature, but couldn't find my wire, so I "borrowed" some of hubby's wire out of his tool box and twisted it into a half doll form.


I didn't have a pattern, but I've seen armatures before, so I just did my own thing with the wire.


I padded the wire with cotton balls and covered them in masking tape to shape a head and torso form.


Then I covered the whole thing in aluminum foil. I don't remember this being in the class, so I'm kind of making it up as I go, and from memory of seeing it in other places.


Once I had it covered in foil, I started covering it in air dry doll clay, which I had left over from another project. I can no longer stand for long, so I covered the front of the torso and left it to dry. 


It's taken me 3-4 sessions to cover the whole thing and add eye indentions, a chin, and a head crown. It's now dry and waiting for the rest of the facial features, ears, arms, and hair, which I have planned on doing the last two days, but it didn't work out. Maybe tomorrow?

So, a few days after I posted this I finally got her some hair, ears, and eyes on, and added more to her cheeks. Boy, ears and eyes are hard, and I didn't do that great, but nevertheless she has some!


I attempted making her arms, but messed them up, so I will have to remake part of them before attaching them to her shoulders. They are in process. I started out using up a partial package of premier doll clay, then opened a new package of La something doll clay. They are both air dry stone clay, but the La Doll is harder to work with, to me. 

She is kind of a study, or prototype, and she has turned out larger than I anticipated, but that's ok. I had intended to put a cage of wooden strips as her skirt, but I think she may fit on the decorative bird cage I have. 

PS: I tried her on the birdcage and she doesn't look right. She's the right size, but she is too long and would need to be cut off at the waist for the cage to actually look like a skirt. I didn't think about that when I was making her, so she will have the wooden strip cage skirt after all.


 The next time I post her, she should be finished, assembled, and painted! Stay tuned for Part 3!

Do something for you every day, even if for only a few minutes! Stay safe!


Thursday, October 8, 2020

A Few More Journal Pages in Progress

 Y'all know that I'm kind of a Jill of all trades and master of none, and I can't stick to just one thing at a time. I also tend to do things in spurts, which accounts for the posts about several unrelated projects that I happen to be working on simultaneously. I often wire wrap a fabric bead, or two, stitch a meditation, stitch a bit in my fabric journal, and add a layer or two to an art journal, all in the same day, as ideas occur to me. I can not enjoy working on one thing from start to finish before starting another, although I admire those of you who can. Of course, I have many half-finished projects laying around that will probably still be unfinished when I die, because I have reached my 71st birthday if I live one more week, and time is moving faster all the time. Anyway, for now, my creative efforts help keep my mind working, they're good for my nerves, and they help keep me sane in this chaotic present world.

So, besides the last posts, I've been adding to my Wandering Muse Wire/Plaster journal (see sidebar for link). I've laid the foundations on a few more pages in the last several days. None of the pages in the journal are completed yet, but I have a start on most of them now. Still very much works in progress!


I painted these pages with acrylic pyrole red for an undertone and stenciled the harlequin pattern with burnt umber, but I loved the harlequin and hated the red, so I tried to remove it, which left bare strips down to the gesso/marble dust mix. Since I didn't want to spend all day trying to get the paint off, I painted a layer of transparent nickel azo gold, I think, over all of it, which warmed it up, and I left it for a few days. It called for blue, so I hand painted the pears and glued down the eggs/nest, which I had been wanting to use for a long time. Waiting to see what comes next! I like it so far...


This is another mess-up. I tried to use the three alcohol inks, thinking they would mingle together into something pretty and interesting for a background. Only, they didn't. They sank immediately into the gesso/marble dust mix and stayed big mis-shapen blobs. Not pretty, or interesting, so I painted a layer of cad red lt over the pages to cover it, but the ink bled through. Then I painted a landscape over the red in acrylic open media paints, but the inks still bled through, so this is where it is for now. Not sure whether to try to fix it, or leave it as is. It does give the landscape kind of a magical look. We'll see what happens!


Another imaginary, but familiar, landscape painted with acrylics over a pyrole red undercoat. I'm not loving it at this point, but can't wait to see how it evolves from here!


These pages are kind of a mish mash of random paint marks, collaged rabbits, stenciling, and an ink/pencil imaginary portrait in progress.


The first page, which I've collaged a black and white printed off old photo of myself. A selfie the old fashioned way, with a camera on a tripod, because I'm that many years old! The quote is torn from an old magazine, because it fit!


These pages started out with a layer of black gesso, over which I glued down a napkin with gel medium, then added some rings with a bottle dipped in red paint. I didn't like it, which explains the turquoise layer of paint over everything, and I added a printed off photo of me, as a child, with my doll, Suzy, whom I got for Christmas that year. I cut the figures out of the photo before pasting them down, and I know I'm going to add a bit of color to them, but I'm not sure yet about the rest of the journey for this story!

So, as I was applying the gesso/marble dust mix to these pages, I adhered the face sketched on a teabag to the bottom left corner, and she sat alone until last week, I added the long girl teabag on the right and sketched her dress over the page. I had about twelve of the sketched faces on teabags from a Jeanne Marie Webb class (see sidebar) a couple of years ago that I never got around to painting, so I thought, why not use them here? Since this photo, made over the weekend, I have adhered the teabags to the pages, drawn their clothes out onto the pages, and added a layer of paint to all of the girl faces and a layer of paint to all of the clothes, except the two in the middle on the left page. That was at the first of this week, and though I've been wanting to get back to them, I haven't yet. But I will!

As you can see, I don't have a particular theme for my journals, or anything else, for that matter. My husband says I fly by the seat of my pants about everything! There might be a theme when it's finished. There might not. But it's all good! It's about the journey! 

Stay safe and creative, and do something that makes you happy at least once a day! It's good for your soul!

Saturday, September 26, 2020

Silver and Gold Wire Wrapped Pendant and Roses

 I haven't accomplished much this week in the way of creativity, but I did experiment on a piece of white sea glass with a mix of silver and gold wire wrapping to make a pendant/ornament. I may have gone a bit overboard and made it a bit too busy, but it was fun, and I like it. I also finished stitching the fabric spiral roses together and have them pinned to the pages of the fabric journal, ready to stitch down. And I worked a little bit in my wire/plaster art journal, but no pictures yet. Maybe, I did more than I thought!


Stay safe and creative out there!

Saturday, September 19, 2020

More Wire Wrapped Sea Glass Pendants

 I played with sea glass and wire a bit more the other day and came up with these pendants. Who knew that I would love playing with wire so much?!!

White and pink translucent sea glass, that I purchased at the Dollar Tree for a different project, with silver, copper, and antique copper 22 gauge wire. You can tell I'm partial to copper! 😁


I wanted blue and green sea glass, but they didn't have any that day, so I came home with pink and white over three years ago, and they've been waiting patiently, until now, to be of use, besides just looking pretty in a bowl! 

I love it when I've bought something for one project, but get sidetracked onto something else, then down the road when I'm doing another project, it's just what I need for it! Not what I originally bought, or saved, it for, but a perfect fit for the current project! That's why I rarely throw anything out...:/


Monday, September 14, 2020

Stitch Meditation 37 and Covering Edges

 This piece may seem somewhat discombobulated. That's because I stitched on it in different sessions over several days, while several things were going on in our lives, including the death of our brother-in-law. So much information is being thrown at all of us from so many directions about all of the things going on in the world that I think it's affecting all of us in one way or another. Some days it's very hard to be positive, but I worked on this piece in spurts, trying to meditate white stitching, until it said, "enough!"


It is about 5" x 5" square, and is made of scraps from new and vintage fabrics, perle cotton and embroidery thread, and embellishments. I used a fabric stamp on a tea stained vintage scrap from and old bed skirt, lace from an old bra cup, buttons cut off some old clothing, and tiny beads. I also had a small scrap of silver wire, left over from a wire wrapping session, that just fit for a forehead dangling embellishment. He also has a little tassel tail. 

The piece may be discombobulated, but I like it. I look at it and see where I was mentally and emotionally while making the stitches.


 I also stitched some eyelet trim onto the ends of the pages in the fabric book (shown in a previous post) to cover the raw edges where I cut the placemat in two. I may add something else to the trim at some point, but, for now, it covers the bottoms of and also adds to the collaged pages. 

This will probably be the last post showing this book for a while, while I add more to the pages, as they tell me what they need. I will share again when it's finished.

Hope you are all staying safe and creative. It certainly is a challenge these days! Take care!

Thursday, September 10, 2020

Wire Wrapped Blue Glass Pendant

 I've seen jewelry made from broken pieces of china online, and I've had this piece of thick glass for a while now, so I thought I'd practice wire wrapping on it. It's a piece from a broken Mason fruit jar that I found out behind my grandparents' old homeplace, also part of where I grew up, so it's kind of sentimental to me. I didn't alter it at all, but just started wrapping wire after I made the bail.


This is the way it wound up at first, with an extra piece of wire added, but it didn't look quite right to me, so I took it back off, plus this background wasn't good.


I like it much better, and this background is better with it! 

I don't wear jewelry much anymore, but it makes a nice memory piece. I like it! Fun stuff! :)

Who doesn't need something to take their minds off of all that's going on in the world? :(


Saturday, August 22, 2020

More WIP Journal Pages

I'm working some every day in my wire/plaster Wandering Muse journal, from Jeanne Oliver's class, along with my stitching and wire wrapping, which I do while watching TV. It may be only a layer painted, or glued, down, or a few marks, but I do something to it! My journal stuff is on the dining room table, which lets me stand up to work on it and stretch my legs at the same time, as I think of something to add. A good thing, because I tend to sit too much! 😀

Right now I have something on about half the pages, so they are on their way! The rest are still the textured white with marks made in the gesso/marble dust while it was wet, and a few have a tiny bit of collage, or a word, which may get covered when I actually start working on them.

I shared the first pages in progress in a previous post. Here are three more that I have started progress on since then. I have actually done a bit more to the first one since I took this picture. 

There's no theme here, and I journal intuitively, having no pre-conceived ideas when I start pages, or as I work on them. I just go where they tell me to go on this fun adventure, and some of my wire-wrapped beads will be added to the spine, and maybe a couple of other places when it's done!


This spread has two failed magazine photo transfers on it, but I am making it work! To start with, I drizzled Sepia acrylic ink all over both pages! I like it! 


This spread may be done. Not sure yet. That's a real wild turkey feather on the right page and little bird cages at the top. The quote says, "God loved birds and invented trees; Man loved birds and invented cages." by Jaques Deval 


Not sure what I'm going to put on these pages yet, but they started out with the cute little bunny collage on the left side!

I shared these pages before, but I added the bird and the rose since then. These are printed copies of two of my favorite pictures of my parents and me in the fifties (I was around 5-6). The girl on the right page is my older cousin, by 8 years, Kaylean, whom I idolized when we were growing up, and though she moved away when she was eighteen, and I never saw much of her again, I stayed in touch and never stopped loving her. She passed away in 2017, four months before my mother died, and I still miss both of them every day, and always will.

The words say, "Don't Believe Everything Your Mind Thinks!", torn from a magazine. The bird and rose were torn from the front of greeting cards and pasted on. I'm not sure what else I'll do to this one. I kind of like the simplicity of it like it is. We'll see!

Still praying for the Coronavirus pandemic to end soon! Stay safe, well, and creative! Thank you for visiting! 💓

Friday, August 21, 2020

Wrapped Rock Experiment

 I only brought back one rock and a small tumbleweed, besides a couple of tee shirts and a cap, as souvenirs from our month long road trip out west last Sept. 2019. And, of course, tons of pictures! The tumbleweed is gone, but the rock has been laying on the table by my recliner for a year. 

We stopped in New Mexico (LOVE NM!) on the side of the road to switch drivers, and on my way around, I noticed this rock sparkling in the sunlight, picked it up, and tossed it in the car. It made the trip all the way up to North Dakota and back down to Tennessee with us.

It's about fist sized, so it barely took up any room, and I wrote the place and date on the back. While researching wrapped wire for beads, came across some photos of rocks wrapped, as well, so I decided to try my hand on my rock.

I am strictly an amateur, and the rock was slicker than fabric, so it took me a few tries to get it wrapped tight enough to stay. At least, I hope it stays! Anyway, I wrapped it in antique copper 18 gauge wire and added a blue enamel charm with a cat looking at the moon. I'm sorry it's not a better photo! 

It looks much prettier sitting on my table now, and it makes a great paperweight with a lot of awesome memories!

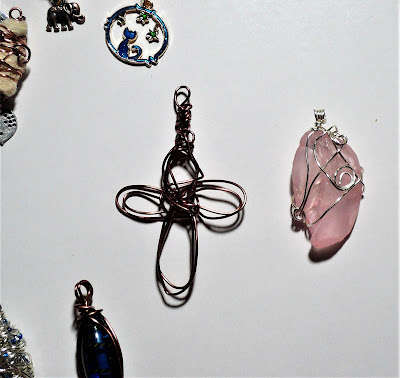
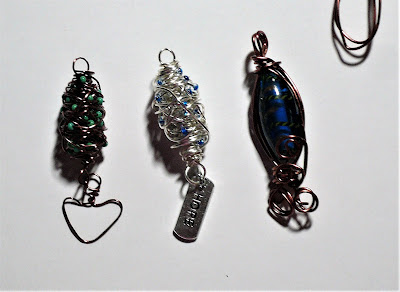
Tiny Wire Projects Practice All Together

 The bead and pendant trinkets I have made from fabric, wire, and glass over the last several days all together. I used gold, silver, and antique copper wire, all 22 guage, except the cross, which is 18 gauge. 

I plan on using the beads as dangles for my art and fabric journals. Not sure about the pendants yet. They were just a fun thing to practice on!


Wire Cross and Wire Wrapped Sea Glass

So, I had this bag of pink and white sea glass that I bought at the Dollar Tree several years ago, and since I am practicing wrapping wire on beads, I thought why not try it on a piece of sea glass. So I did! I also made one of my first attempts at making a pendant bail. 

While I was at it, I decided to try making an all wire copper cross pendant with a bail, with no instructions, just making it up as I went. I like it!


Another Wire Bead with Beads and a Wire Wrapped Glass Bead

 I enjoyed making the all copper wire bead with beads, so I made an all silver one, as well. I recycled the large blue glass bead from a raffia bookmark I made several years ago, wrapping it in copper wire with a bail. They are much prettier in reality. Maybe, I'm starting to get the hang of wrapping wire!


Wednesday, August 19, 2020

My Latest Wire Wrapped Fabric Beads

 3 fabric beads, made from recycled scraps and wire wrapped with gold, silver, and copper, with charms added. The last one hasn't had the charm added yet. Practice makes better! Not perfect, but good for my purposes!


What's on My Stitching and Wire Wrapping Desk?

 On my "in front of the TV" table: A box lid containing wire wrapped projects (fabric buttons, wire beads, a wire cross, and a couple of pendents), which I am learning on, a rock, and blank fabric beads ready for embellishments, an example page for a new fabric journal idea that I got from sewselvaged on Instagram, and a new box of brighter colored perle cotton (Eleganza), and an updated stitch meditation.

Not shown: Needle book and stitching stuff, spools of wire, wire tools, packages of charms and jewelry findings, and a bag of meditations pinned together, ready to stitch, and a couple of meditation pieces in progress. I should have just made a picture of the whole table! :)

Another one of my happy places!


This is stitch meditation #36, which I posted a couple of posts back, before the buttons. It kept nagging at me until I used another session to give it some buttons. I like much better. The pieces will tell you what they need if you just pay attention! :)


Thursday, August 6, 2020

First Handmade Copper Wire Bead with Beads!

While doing research several days ago for wire wrapping fabric beads, I came across a youtube video by a lady who makes wrapped wire jewelry, and I watched her make a bead, which included beads. Day before yesterday I decided to try making one, from memory of the video. Not exactly like hers, which was gorgeous, but I wouldn't want it to be. 👵 

I used antique copper 22 gauge wire and tiny plastic beads. It's about an inch long without the charm, and maybe half an inch wide (I'm guessing), kind of heavy, and it took a lot of wire and a bit of patience. I just bought the copper wire, so I didn't have any copper jewelry findings, except a tiny elephant, which I didn't want to use, so I made the o rings and the heart charm.

The photo doesn't do it justice. The density of the bead makes it look darker under the light than it actually is. I'm glad I tried making one. I enjoyed the process, I think it's pretty, and I think I'll make another one!

Sunday, August 2, 2020

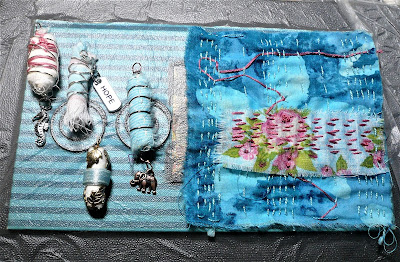
Stitch Meditation 36 and New Fabric Beads


This is my latest stitch meditation using Turquoise batik cotton and a rose pattern cotton with a loose weave, bluish/green perle cotton and pink dmc embroidery thread, and fabric beads from recycled scraps, stitched together, and wire wrapped in silver, gold, and copper with metal charms added.

I later went back and added some buttons. Much better, I think!


It's not the best background, but I laid them on my wire and plaster journal, which I put cling wrap on the covers of, to protect them from stray paint and whatever else may escape when I'm working on the pages. It was handy!

I not only practiced wire wrapping some more, and I think I'm getting a bit better at it, but I practiced adding charms and o rings to the wire loops formed in the beads. Kind of tedious when you have big hands/fingers. The charms are a tiny silver seahorse, a word charm that says "hope", gold bead caps left over from a long ago project, and a tiny copper elephant, which I also had to make a copper o ring for, because I only had silver ones, also from a different project. Three of the the beads are new, but one I made before and shared without the charm.

The new Blog format wouldn't let me remove the first picture, or, at least, I couldn't figure it out, but I added the second picture, which is, I think, a bit better.

These little projects, plus working in my wire and plaster art journal are helping keep my mind off the virus and other stuff, plus they are just downright fun and good therapy. Let the dust bunnies multiply! 😏

I hope you all have something to help get you through these tough times, something that makes you feel happy or relaxed. Stay safe!

Thursday, July 23, 2020

Stitch Meditation 35 with Handmade Beads Wire Wrapped


My latest stitch meditation, using two of the fabric wire wrapped beads from the previous post, a cotton scrap, a cat from an old ironing board cover, and perle cotton thread.

Tuesday, July 21, 2020

More Wire Wrapped Bead Practice

Stitched about a dozen fabric beads that I had rolled and pinned together last week, then practiced wrapping wire on three of them. I only have silver wire for now, but I have ordered some copper and gold colored wire, and also a larger antique copper wire to make another journal.


The first bead is from an old oxford cloth shirt of mine, and the other two are from left over cotton. Hoping to get better at wrapping the wire with practice!

Sunday, July 19, 2020

Learning to Wire Wrap Handmade Beads

I've been playing with making fabric beads, embellishing them, and am learning to wire wrap them. I finally got some wire the right size that's easy to work with (Anezus jewelry wire silver 22gauge). I had some copper jewelry wire, but it's so thin and flexible that it won't hold the twists, etc. I also had some thin red wire, I don't know from what, that works great, but breaks easily. I mixed some of that in, but the silver wire is the main one, except on the gold bead.

I looked at several online sources for tutorials, but didn't find what I was looking for, so I'm basically teaching myself by trial and error. I did pick up a few tips. Thank you to those teachers, who so graciously share their knowledge and experience with those of us trying to learn a particular art or craft.


The first bead on top was one of the first fabric beads I tried to make a couple of years ago, and I used gel medium on the whole thing, making it a hard bead. The rest are made from various strips of cotton, satin ribbon, and ribbon with wire edges (gold) stitched together.

Top Row: I was learning to make a loop with a plastic bead on the first bead, and I played with wrapping silver wire around it, trying to learn to control the wire. It was also the first bead I tried to wrap. The second bead I stitched some one, then wrapped it in silver wire. The third bead is made from a wire ribbon, and I used the thin red wire to wrap it. It doesn't jump out at you, but it's there. I love red and gold together.

Bottom Row: The first bead has a kind of wire cage-like design combining the silver and copper wires. The middle bead is a pink satin ribbon rolled, stitched together, and wrapped in silver. The last bead has a thin strip of colored fabric cotton wrapped around the bead and stitched, then silver wire wrapped around the middle, then stitched on the ends and wrapped with gray perle cotton thread. It's a little fatter than the others.

These are by no means perfect, or even pretty maybe, but they were fun to make, I'm learning a new technique with the wire, and I have at least a dozen more fabric beads rolled up and waiting to be practiced on with embellishments! I do not lack for ways to entertain myself!

Only thing is, now I want to order more wire in different colors and more perle cotton thread in bright colors!

I'm also working on a couple of pages in the Plaster and Wire journal I made this past week, but no photos yet! Getting used to the feel of the thicker gesso/marble dust textured pages! I had meant to do more to them today, but got caught up in other things. Now I need a nap!

The virus is just now getting to our county, and for the first time, it has hit people that we actually know, which makes it much more real. I guess we will be staying in for a while longer and praying for it to stop spreading. Scary! Especially for us old folks!

Stay safe, well, and cool wherever you are, and may we all have a blessed and creative week!


Thursday, July 16, 2020

Making A Wandering Muse Art Journal!

I had so much fun making this art journal, and I love how it turned out, inspired by Jeanne Oliver's free class for a plaster journal in her Wandering Muse online course. https://jeanneoliver.com/courses/fabric-plaster-art-journal/

I had to substitute many of the supplies for what I had on hand: gessoed canvas on a roll for artists instead of regular canvas for covering with, instead of plaster of Paris or Venetian plaster I used marble dust mixed with gesso and flexible modeling paste, covered inside covers with scrapbooking paper, used cotton instead of heavy French linen for the spine, regular hard novel covers instead of vintage heavy book covers, grommets instead of eyelets, and a heavier wire that I found. The wire was a bit difficult to work with, but it worked out okay!


A few of the supplies: Covers from an old Anne Rice novel, cotton fabric, scrapbooking paper, and 3 signatures made from unstretched artist canvas measured, cut, and folded, and gessoed on one side...


Scrapbooking paper glued with gel medium to the inside covers and when that dried I glued the cotton spine to the covers...


I didn't like the plain spine, so I tried adding some burnt umber acrylic ink and water, and I began plastering the pages and adding pictures/words and/or marks into the wet plaster...


Some pages with acrylic paint and words added into the wet plaster; the top and side pages are gesso mixed with marble dust and the bottom blessed pages are coated with flexible modeling paste...


Some pages after the signatures have been attached to the cover; there are 3 signatures adding up to 36 pages. The wild turkey feather was imbedded into the wet "plaster" before assembling.


A bit of color was added to the plaster before assemblage and I scraped the word, faith, into the wet plaster also.


The plain cover and the dry pages all plastered and folded into 3 signatures...


I didn't like the spine with the burnt umber acrylic ink at all, so I found a piece of cotton that I had dyed with rust in a previous project, cut the umber piece out, and glued in the rust cloth. I like it much better! Here, I have also attached the first signature to the spine with wire, which was a little bit too large and stiff, but it worked, and I have also attached some grommets from another project, because the eyelets I had were too tiny. The blue striped piece is from a small poetry book. I love the cover and wanted to use just that for the cover, but it was a bit too small for a journal, so I glued one cover to the front , and I like it a lot.


The inside front cover with upholstery tack embellishment and the first signature attached...


The inside back cover waiting to have the next two signatures attached...


I only had enough wire to attach two, so I used it on the first and third signatures, and hubby found a large heavy covered wire from something and peeled the coating off of one of the inside wires for the wire for the middle one. There is a bit of a difference in the color, but I think they work well together.


I like the look of the rusty cloth, the patina on the wire, the brass grommets, and the leather tie together!


I originally wanted an aged metal piece to go on the cover, but couldn't find what I wanted. I did find this artist trading card that I made years ago, which is an original linocut print, and I liked the look of it, so glued it down and let dry while I looked for something to finish the cover off.


I added a leather strip tie and called it done, but then I noticed a box of spiral metal paper clips sitting nearby, which happened to have some pewter colored ones, and


I think they finished the cover off rather nicely. I had a word that I wanted to use on the cover, but couldn't get it to look right, so I left it off, for now. So, this is the front cover for now. The back is still plain black. I may, or may not, add something to it later.


The finished journal, full of 36 luscious, textured, plaster covered pages just waiting for me to play on them. I loved the process, and I love my new journal!

I usually watch online class videos, then try to follow the instructions by memory, instead of following along with the teacher as she does them. My memory is not that great anymore, so I may, or may not, have followed her instructions as on the video. Anyway, I'm pleased with the journal, I enjoyed making it, and it makes me happy!

I hope you enjoyed my photo journey, and I hope you are staying well, safe, healthy, and creative during this confusing and scary period of time!